

ENGINEERED FOR EVERYONE
What Is Crosstalk and What Does the Crosstalk Reduction Circuit Do?
Phono cartridge crosstalk reduction has a great effect on sound stage depth and width, as well as the position of sounds across the stage. When the azimuth is off one channel will be “in phase” and the other will be “out of phase” and this effects the sonic imaging positioning across the sound stage.
When the XTR controls are turned clockwise toward the + side, the XTR is correcting for “in phase” crosstalk. When the controls are adjusted counterclockwise to the – side the XTR is correcting for “out of phase crosstalk”.
HOW TO USE THE CROSSTALK REDUCTION CIRCUIT IN THE FUSION F159 and “FOZ” XTR.
CROSSTALK CONTROL LAYOUT LOCATIONS.

Fusion F159 Crosstalk Controls
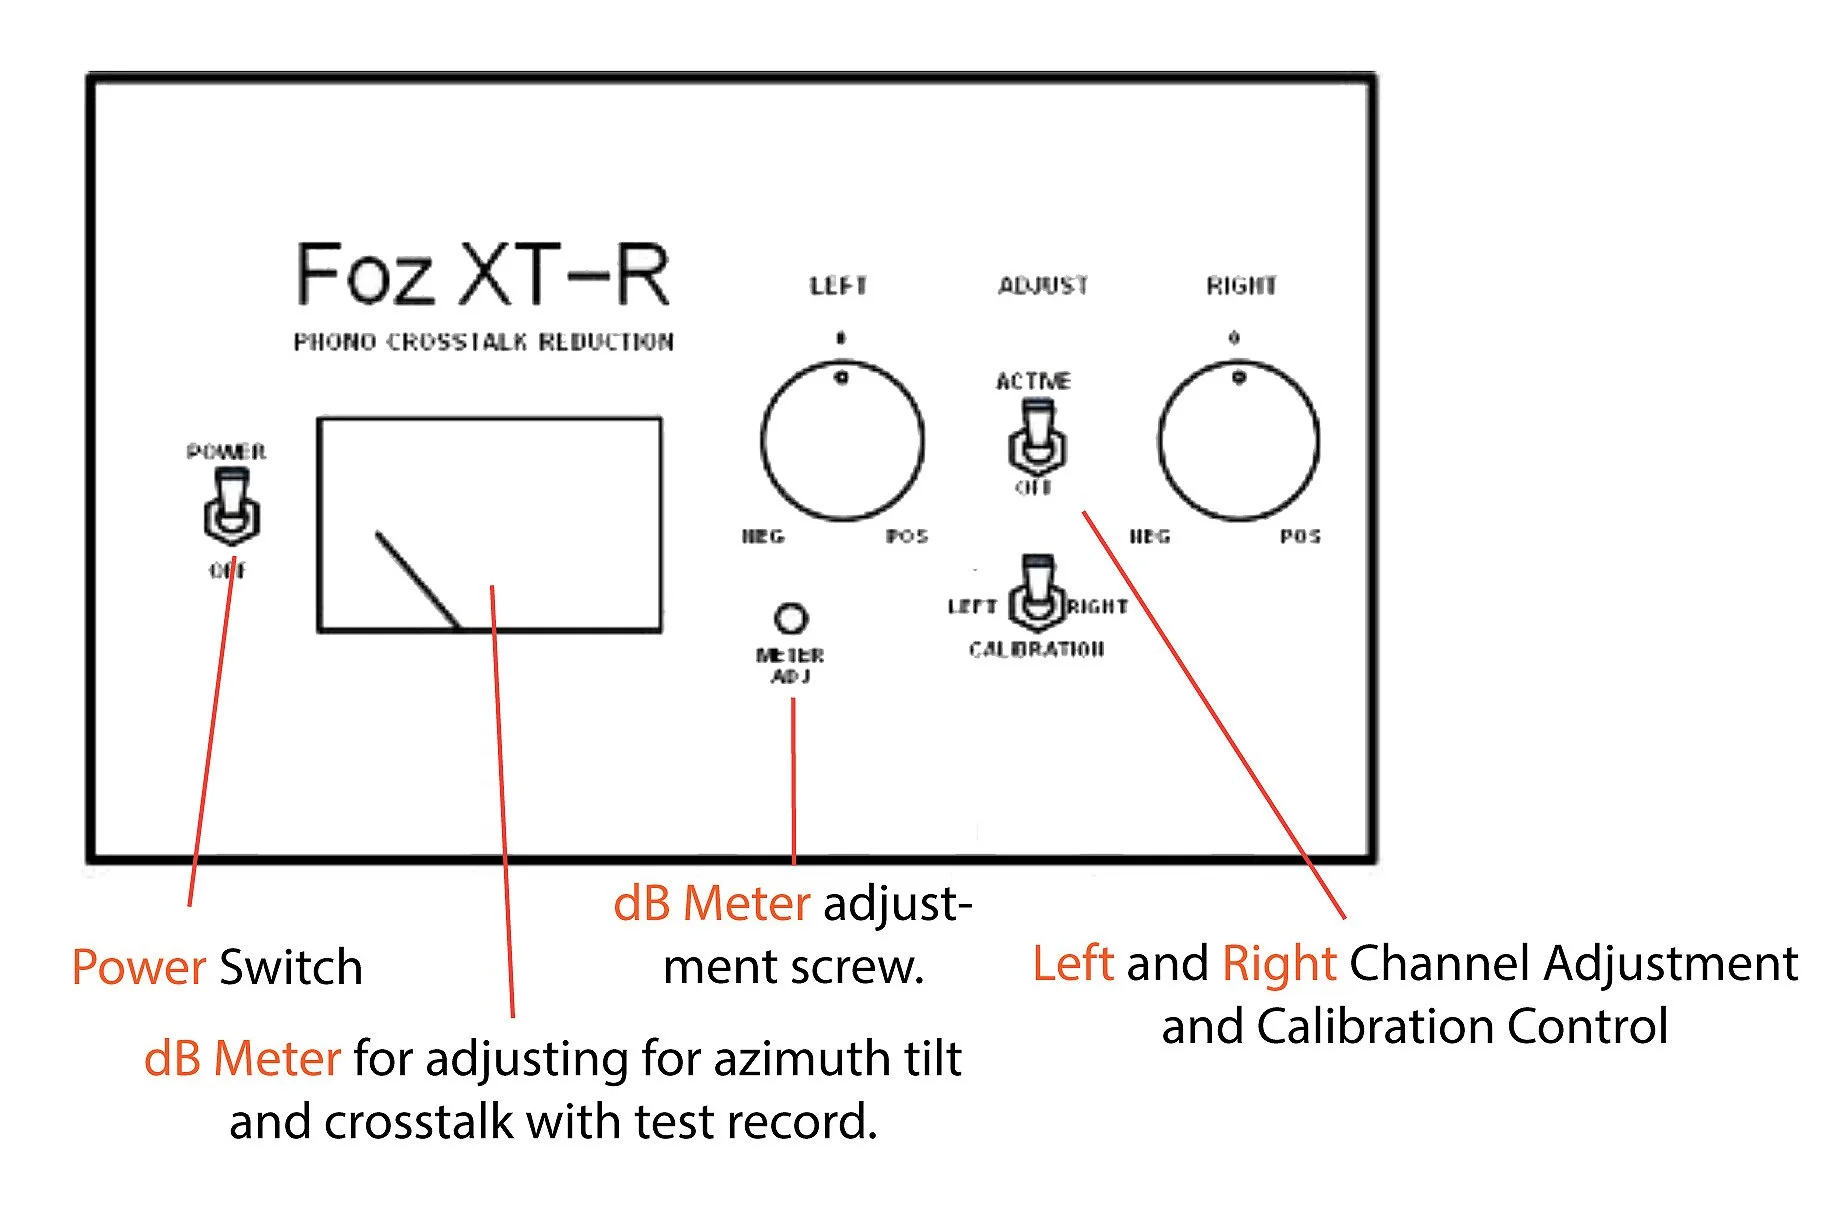
XTR Crosstalk Controls
How To Manually Adjust Your Azimuth With The FUSION F159 or “FOZ” XTR
How to use the XTR and F159 to adjust the physical Azimuth of your cartridge to make sure the needle is perpendicular in the grove, like the popular Fozgometer. You do not have to do this to use the XTR, you can skip to the next section if you wish.
Azimuth is never perfect with just a physical adjustment, but the XTR and F159 allow you to get it as close as possible in this mode, so that when you engage the circuit you can achieve the most perfect balance and channel separation possible. (Note: You still need to measure again as per the instructions to calibrate the azimuth correction and crosstalk reduction feature of the unit.)
IMPORTANT: Before you begin familiarize how to adjust your cartridge Azimuth according to your turntable manufacturer instructions. This is an optional step which comes before the calibration described in your manual.
Step 1: Lower your tonearm onto the test record and adjust visually from the front to make the cartridge body as parallel to the record surface as possible.
Step 2: Set all adjustment knobs on the XTR or F159 to the 12 o’clock position with the mark straight up to the ceiling.
Step 3: Set the Active switch to the off position.
Step 4: Use the Left or Right switch to select the track you will be playing on the test record. We will start with the Left Channel for these instructions.
Step 5: Select the Left Channel with the selector switch.
Step 6: Play the Left Channel tone with your test record.
Step 7: Make a note of the position that the needle rests at with the meter. Pro Tip: Write this down or take a photo with your cell phone)
We will now move onto the Right Channel.
Step 8: Select the Right Channel with the selector switch.
Step 9: Play the Right Channel tone with your test record.
Step 10: Make a note of the position that the needle rests at with the meter.
Step 11: Compare and Note the difference between the Left and Right Channel measurement.
Step 12: Alternate playing the Left and Right test track each time making very small adjustments in Left and Right Tilt(Azimuth) of the cartridge until both readings are the same or as close as possible. Usually, if looking at the cartridge from the front you typically twist counter clockwise to increase the Right Channel and clockwise to increase the Left Channel strength. The goal is getting the channel reading to be as close to each other as possible.
For example if the Left Channel reads 3 and the Right Channel reads 1 then you want to adjust your Azimuth to add more Right Channel. Then retest the Left and Right channel and try to get the reading to be as close to 2 as possible in both the Left and Right Channels. What you’re trying to do is find the best balance between the left and right channel.
Step 13: Play the test tracks once you feel you have the best Azimuth alignment possible and verify the Left and Right track register closely on the meter.
Step 14: Finally, measure and calibrate again as per the instructions with the circuit active to calibrate the azimuth correction and crosstalk reduction feature of the unit.
How To Calibrate The Crosstalk Reduction Circuit On Your FUSION F159 or “FOZ” XTR
Before you begin: We are not trying to reach 0 on both channels, that is not how the balancing works, please follow the steps below carefully.
Step 1: Place the Black Ice Calibration record on your turntable.
Step 2: Flip the XTR toggle switch upward to the active position.
Step 3: Flip the calibration switch to the left position. Please Note: When the switch is set in the middle, both right and left channels are operating. When the switch is set to the left, only the left side signal is operating. When the switch is set to the right, only the right-side signal is operating.
Step 4: Play the Left azimuth adjustment track. (The meter is reading the right channel). Adjust the left control knob to the lowest reading on the left which is called the signal “null point”. You can identify the null point when the meter quickly deflects back to the right. Set the calibration to the null point, you may need a few tries to identify it.
We will now move onto the Right Channel.
Step 5: Select the Right Channel with the selector switch.
Step 6: Play the Right Channel tone with your test record..
Step 7: Play the Right azimuth adjustment track. (The meter is reading the left channel). Adjust the right control knob to the lowest reading on the right which is called the signal “null point”. You can identify the null point when the meter quickly deflects back to the right. Set the calibration to the null point, you may need a few tries to identify it.
The null point often will not not match between the left and right channels and that’s OK and correct.
Please Note: If your meter reads off the scale to the left or right, check that the cartridge channels are not reversed. If the meter remains off scale to the right, turn the meter adjustment screw clockwise. If the meter is off of the left side, turn the adjustment screw counterclockwise. The meter has a range of 30 dB and will typically need to be recalibrated.
For the highest accuracy it is recommended you repeat the left and right calibrations one more time. To play music return the calibrate switch to the center position and keep the active/off switch in the active position. You can use this switch to hear the difference the crosstalk reduction has made.
Calibration will not change unless the cartridge alignment is changed, or a new cartridge is installed. Some cartridge suspensions may change with age. We suggest that you perform a recalibration at six-month intervals.